Thursday, May 31, 2012

SSIS Step by Step 002 - Output data to multiple flat files

Requirement & Preface

In this article, we're going to output data from database to multiple flat files. 

We are going to learn:
1. How to use a variables to save a query result set from database.
2. How to get each value from this result set.
3. How to use Loop Container to loop a result set from database.
4. How to configure the connection string for a flat file by using variable.
5. How to use ADO.NET and OLE DB connection
6. How to use variable when do query in OLE DB source

Testing data and table are from the first article SSIS Step by Step 001 - Load data from a flat file

Here're some records from this table.


AddressID AddressLine1 AddressLine2 City StateProvinceID PostalCode SpatialLocation
25 9178 Jumping St. NULL Dallas 73 75201 NULL
26 5725 Glaze Drive NULL San Francisco 9 94109 NULL
27 2487 Riverside Drive NULL Nevada 74 84407 NULL
28 9228 Via Del Sol NULL Phoenix 6 85004 NULL
29 8291 Crossbow Way NULL Memphis 72 38103 NULL
30 9707 Coldwater Drive NULL Orlando 15 32804 NULL
31 9100 Sheppard Avenue North NULL Ottawa 57 K4B 1T7 NULL
32 26910 Indela Road NULL Montreal 63 H1Y 2H5 NULL

We want to extract data by City and output these data to different (city) files.

Steps
1. Create a new package  - CH02_OutputFlatFile

    Create two variables: 
    The first one is Citys, Data Type - Object, we will query all cities from database and save to this variables.
    The second one is City, Data Type - String, the single city from Citys variable.

    Drag an Execute SQL Task to control flow pane, name - EST_LoadCitys


2. Edit EST_LoadCitys
    Notice the connection type is ADO.NET, we will load all data save as a FULL RESULT SET to a variable.
    SQL Statement will extract and group by cities from database.

   SELECT City
 FROM dbo.[Address]
 GROUP BY City


3. See Result Set pane, that means all values from database query will save into user variable Citys.


4.Drag a Foreach Loop Container  and connect to EST_LoadCitys, click Foreach Loop Container and edit it.


5. Edit Foreach Loop Editor

   We choose Foreach ADO Enumerator as an Enumerator.
   For ADO object source variable, user variable Citys is the source in loop container.

   Mark - Rows in the first table. 


6. In Variable Mapping, set City variable, which means in every loop, the value of City gets from each row of Citys variable in step 5.


7. Drag a Data Flow Task, add it into Loop Container.

   Then, go into DFT_GenerateFiles data flow task


8. Add an OLE DB Source 


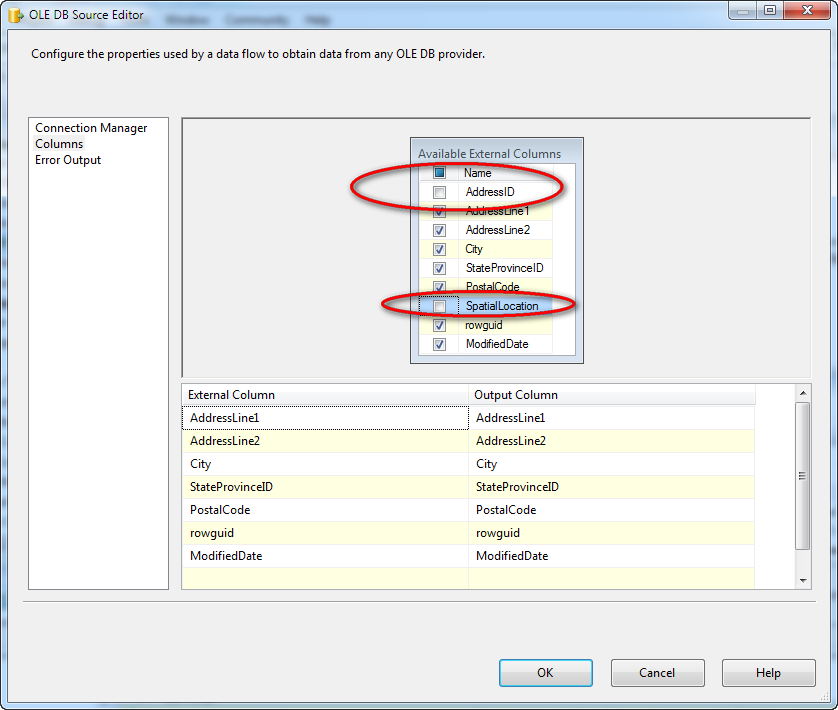
9. Edit the OLE DB Source
    Add an OLE DB connection manager, then we use SQL to load data, notice there's a parameter ?

     SELECT *
  FROM dbo.[Address]
  WHERE City = ?

     In every loop, string variable city will get a value from object variable Citys, we use the variable city to query the address information.


Click 'Parameters..'  Set user variable city as a parameter in above SQL.


Click OK.


10. Do mapping with this query, we don't need Address ID and Spatial Location as usual.  The we finished the OLE DB Source task.


11. Drag a flat file destination into data flow pane, name it as 'FFD_AddressByCity', and pass the connection to FFD_AddressByCity.


12. Edit FFD_AddressByCity and new a connection manager.


Choose 'Delimited'


13. Input information as red cycle marks.
      Note - the file name  ****\CH02-Citys.txt.  This file doesn't exist, I click browse to create one. But actually all data won't go into this file, we will configure the file path later. Because there're many cities in database, each city have a flat file which have the current city address information. 


Click OK.


14. When the connection manager done, do mapping for flat file.
     The input is from OLE DB SQL Query result set.
     The destination is the flat file.


15.  Back to the data flow pane.
       Click CM_FF_AddressByCity in Connection Manager Pane, we're going to configure the file path.

       Connection String  - the destination file path
       Expression - Use variable to configure some properties of connection manager (CM_FF_AddressByCity)


Click 'Expression' in properties of 'CM_FF_AddressByCity'


Click '...' to configure ConnectionString property of connection manager.


16.  Expression Builder

      My current outgoing folder is located in Disc F. You can modify it to your real local path 
     Notice the file name will be :  CH02-Citys-[City Name].txt

     "F:\\SSIS Projects\\Testing Files\\CH02-Citys-"+ @[User::City] +".txt"


Click Evaluate Expression to see if the expression is correct.
Click OK.


17. Execute package, see whole green - PASS !


18.  Go to output folder seeing many output files there, the file names are what we want.


19. Validate the information. 
      Address are divided by city name. 


Get all SSIS Step by Step, refer to  SIMON'S SSIS Step by Step

Please let me know if you have any questions about this blog.
Contact to me by email - simonlvpin@yahoo.com
Or Skype - simonlvpin


Wednesday, May 23, 2012

SSIS Step by Step 001 - Load data from a flat file

SSIS Step by Step 001 - Load data from a flat file

Requirement & Preface
We are going to load data from a flat file, data format in flat file as blow:


AddressID,AddressLine1,AddressLine2,City,StateProvinceID,PostalCode,SpatialLocation,rowguid,ModifiedDate
1,1970 Napa Ct.,NULL,Bothell,11,98011,NULL,9AADCB0D-36CF-483F-84D8-585C2D4EC6E9,2002-01-04 00:00:00.000
2,9833 Mt. Dias Blv.,NULL,Bothell,79,98011,NULL,32A54B9E-E034-4BFB-B573-A71CDE60D8C0,2003-01-01 00:00:00.000
3,7484 Roundtree Drive,NULL,Bothell,79,98011,NULL,4C506923-6D1B-452C-A07C-BAA6F5B142A4,2007-04-08 00:00:00.000
4,9539 Glenside Dr,NULL,Bothell,79,98011,NULL,E5946C78-4BCC-477F-9FA1-CC09DE16A880,2003-03-07 00:00:00.000
5,1226 Shoe St.,NULL,Bothell,79,98011,NULL,FBAFF937-4A97-4AF0-81FD-B849900E9BB0,2003-01-20 00:00:00.000

This file has a file header and multiple records, data in rows are delimited by a comma.

We load all data from this flat file into a table in database.

Steps

1.  Create a demo database, all demos in 'SSIS Step by Step' bases on this database, so you can use below script to create a demo database. 

---------------------------------------------------------------------------
-- Script U01-CH01-001
-- Create demo database
---------------------------------------------------------------------------
USE [master]
GO

IF  EXISTS (SELECT name FROM sys.databases WHERE name = N'SSISDemoDB')
DROP DATABASE SSISDemoDB
GO

USE [master]
GO

/** Make sure there's a folder (E:\Projects\Database) in your local machine,
    or you can change the folder name **/
CREATE DATABASE SSISDemoDB ON  PRIMARY
( NAME = N'SSISDemoDB_Data', FILENAME = N'E:\Projects\Database\SSISDemoDB_Data.mdf' , SIZE = 174080KB , MAXSIZE = UNLIMITED, FILEGROWTH = 16384KB )
 LOG ON
( NAME = N'SSISDemoDB_Log', FILENAME = N'E:\Projects\Database\SSISDemoDB_Log.ldf' , SIZE = 18432KB , MAXSIZE = 2048GB , FILEGROWTH = 16384KB )
GO

2.  Create a demo table which will save data from the flat file. This table will be used again in next blogs.
---------------------------------------------------------------------------
-- Script U01-CH01-002
-- Create demo table
---------------------------------------------------------------------------
USE SSISDemoDB
GO
 
IF  EXISTS (SELECT * FROM sys.objects WHERE object_id = OBJECT_ID(N'Address') AND type in (N'U'))
DROP TABLE [Address]
GO

CREATE TABLE [Address](
[AddressID] [int] IDENTITY(1,1) PRIMARY KEY NOT NULL,
[AddressLine1] [nvarchar](60) NOT NULL,
[AddressLine2] [nvarchar](60) NULL,
[City] [nvarchar](30) NOT NULL,
[StateProvinceID] [int] NOT NULL,
[PostalCode] [nvarchar](15) NOT NULL,
[SpatialLocation] [geography] NULL,
[rowguid] [nvarchar](120) NOT NULL,
[ModifiedDate] [datetime] NOT NULL
)
GO


3.  Create a SSIS solution, choose Integration Services Project


4.  Change the package name and drag a Data Flow Task from Control Flow Items to Control Flow.
     And change the data flow task name to be DFT_LoadFlatFiles


5. Go into DFT_LoadFlatFiles and drag a Flat File Source to Data Flow.
  Change the name of flat file source to be FFS_PersonAddress.

  We need to click FFS_LoadFlatFiles and to build a flat file connection manager which is band to this component and connect to a flat file.


6.  See this Flat File Source Editor, we need to build a connection manager first, click the 'New' button.


7. Input descriptions for a connection manager first.
   Then browse the incoming file where the data exists.
   
   You can copy the data where I post in Requirement & Preface and save to a flat file, then browse and choose this file.

   Here's my test file.

  Notice the format - Delimited
  And choose Column names in the first data row. Because the testing file do have a data header.

8. Click Columns, see our Row delimiter should be {CR}{LF} and Column delimiter - Comma. 


    Actually, we have many choice, but in current flat file the column are delimited by Comma.

9. Click Advanced, we need to choose the proper data type for SSIS transformation. There's difference about the data type between SQL and SSIS.
    You can refer to http://msdn.microsoft.com/en-us/library/ms141036.aspx to know more about the SSIS data type.


    The table script for Person Address we can see here:


[AddressID] [int] IDENTITY(1,1) PRIMARY KEY NOT NULL,
[AddressLine1] [nvarchar](60) NOT NULL,
[AddressLine2] [nvarchar](60) NULL,
[City] [nvarchar](30) NOT NULL,
[StateProvinceID] [int] NOT NULL,
[PostalCode] [nvarchar](15) NOT NULL,
[SpatialLocation] [geography] NULL,
[rowguid] [nvarchar](120) NOT NULL,
[ModifiedDate] [datetime] NOT NULL

    For NVARCHAR SQL Data type, we use Unicode string [DT_WSTR] in SSIS.
    For INT in SQL data type, we use four-byte signed integer.
   Other please see pictures.
   Besides, [SpatialLocation] [geography] NULL, we can't transfer it in SSIS directly, there's no mapping data type in SSIS, if we have to process it we need to write script to handle it. In this article, we aren't going to process this column.
 If want to know more about the spatial data, please Google it or refer to other article - http://www.sql-server-performance.com/2010/spatial-data-support-ssis/


After this, click OK.

10.  Back to Flat File Source Editor. See we have already built a Flat file connection manager.
       Click Columns where we can decide which columns we need to pass into next SSIS component.


   Sometimes, a flat file may include many columns, but we may only choose some columns to pass to next component and insert them to a table. 
   In this demo, we choose all columns to pass.

   Click OK, then back to Data Flow Design window. We can see there's a flat file connection manager instance exists in Connection Manager pane.


In data flow, we have created a 'Source', obviously this source is a flat file, then we are going to choose a destination component which should be a table.

11.  See Data Flow Destinations, drag a 'OLE DB Destination' to data flow and change name to be 'DST_PersonAddress'.
       Drag the green connection arrow from FFS_PersonAddress to connect to DST_PersonAddress, that means the columns we choose in FFS_PersonAddress will as an output columns pass to DST_PersonAddress. 


12. Double click DST_PersonAddress, edit it as blow ways.
      
     We need to built a connection from SQL Server to this component, so click 'New' to create a OLE DB Connection manager.


Because we use local machine, so we server name - localhost
Then we can choose the demo database from the list. 


Click OK, see we get a data connections from local server and demo database.

Click OK.

13. We can find another connection shows in Connection Manager Pane.
    So there're two connections.
    First connection - to build a connection from a flat file to FFS_PersonAddress
    Second connection  - to build a connection from a database table to DST_PersonAddress

    Between FFS_PersonAddress and DST_PersonAddress, we connect them and FFS_PersonAddress will pass the values from flat file to DST_PersonAddress, thus, data from flat file will go into the database table.

 Right click and execute this package.


Green..is OK. 

I will add error process in later tutorials. 

Validate data in database table, congratulation ! we done!